
The Clinic Sterile Room: Four Zones and a One-Way Workflow
Most failures after sterilising happen because clean and dirty items meet again. How a sterile processing room or bench is divided, what happens in each zone, the order instruments move in, and the optimal arrangement when a clinic has only one small room.
The rule: instruments move one way
CDC’s dental infection-control guidance says instruments should be processed in a designated central processing area divided into four sections: receiving, cleaning and decontamination; preparation and packaging; sterilisation; and storage — ideally with walls or partitions to control traffic and contain contamination. WHO’s manual describes the same principle for hospital sterile services: a clear unidirectional flow from dirty to clean, with no crossover of staff or devices.
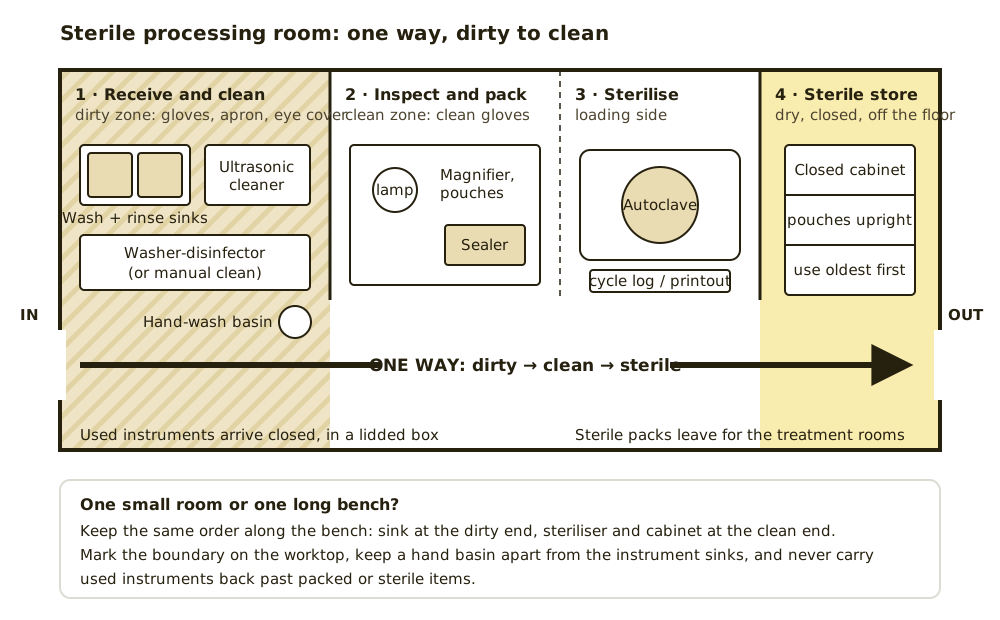
The four zones and what happens in each
| Zone | What happens | Equipment | Key rule |
|---|---|---|---|
| 1. Receiving, cleaning and decontamination | Used instruments arrive in a closed container; they are sorted, cleaned and rinsed | Instrument sinks separate from the hand basin, ultrasonic cleaner or washer-disinfector, brushes, detergent | Heavy-duty gloves, apron, mask and eye protection; nothing clean or sterile is kept here |
| 2. Preparation and packaging | Clean instruments are dried, inspected under light and magnification, assembled and packed with an internal indicator | Magnifier lamp, pouches or wraps, heat sealer, indicators, labels | Only clean, dry, inspected items enter; anything with residue goes back to zone 1 |
| 3. Sterilisation | Packs are loaded, the cycle is run and recorded, and packs dry in the chamber | Autoclave, cycle printer or data logger, test packs | Daily air-removal test on vacuum machines; leave packs until cool and dry |
| 4. Storage | Dry, intact packs are stored and issued oldest first | Closed cabinet or drawers off the floor, away from sinks | Wet, torn or dropped packs are reprocessed |
Step by step through the workflow
- At the chair: wipe off gross debris and put used instruments in a closed, puncture-resistant container. If they cannot be cleaned straight away, CDC advises soaking them in detergent or an enzymatic cleaner so patient material does not dry on; a high-level disinfectant such as glutaraldehyde is not recommended as a holding solution.
- Receiving: open the container only in the dirty zone, wearing puncture-resistant heavy-duty gloves. Do not reach into trays of sharp instruments.
- Cleaning: use a washer-disinfector or ultrasonic cleaner where possible; scrub by hand under water with a long-handled brush only when needed.
- Rinse and dry: rinse off detergent and dry thoroughly; water left on instruments becomes a wet pack.
- Inspect: check under light and magnification for residue, damage and corrosion; reclean or remove anything that fails.
- Pack: pouch or wrap with an internal chemical indicator, and label each pack with the date, steriliser and cycle number.
- Sterilise: load as the steriliser maker instructs, run the correct cycle and keep the cycle record.
- Cool and store: CDC says packs should dry inside the chamber and not be touched until cool and dry, because hot packs act as wicks for moisture and bacteria from hands. Check the indicator and seal, then store.
Read next Cleaning instruments before sterilisationHow to load an autoclave
What is optimal for a small clinic
A separate room if you can
A dedicated reprocessing room that is not used as a corridor or storeroom is the easiest to keep in order. WHO’s rules for sterile services include that the area is not a thoroughfare and has clearly separated dirty and clean activities.
One long bench if you must
CDC accepts that when physical separation cannot be achieved, adequate spatial separation may be satisfactory if staff are trained in work practices that keep clean areas from being contaminated. Keep the same order along the bench and mark the boundary on the worktop.
Size it to the workload
CDC also says space should be adequate for the volume of work and the items to be stored. Allow landing space for dirty instruments waiting, clean instruments drying and sterile packs cooling, so none of them has to share a surface.
Services
An instrument sink deep enough for the largest item, a separate hand-wash basin, the electrical supply each machine’s maker specifies, and ventilation for the heat and steam the autoclave and washer give off.
Equipment and space checklistCommon workflow mistakes
| Mistake | Why it matters |
|---|---|
| Cleaning instruments in the hand-wash basin | Contaminates the basin staff use to clean their hands |
| Sterile packs stored beside the instrument sink | Splashes wet and contaminate the packs |
| Carrying used instruments past the sterile cabinet | Breaks the one-way flow |
| Handling packs while they are still hot | Hot packs act as wicks, drawing in moisture and bacteria (CDC) |
| No link between packs and cycles | Packs cannot be recalled if a spore test or cycle fails |
| Glutaraldehyde used as a holding soak | Not recommended by CDC; it is a chemical hazard and does not replace cleaning |
Read next Cycle records and traceabilityWriting the workflow into an SOP
Related guides
Autoclave supply near you
Written quotes for clinics across Malaysia, handled from Batu Caves, Kota Kinabalu and Kuching.
Sources and further reading
Frequently asked questions
What is a sterile room in a clinic?
What are the four zones of sterile processing?
Can a small clinic use one bench for sterile processing?
Where should sterile packs be stored?
Get a written quotation
Tell us your clinic or lab type, daily workload and location. We match suitable models and send a written quotation that states who handles delivery, installation and training, and what each costs.
010-905 2891 · Mon–Sat, 9:00 am – 6:00 pm