
Wet Packs After Autoclaving: Why They Happen and How to Stop Them
A pouch that comes out damp is not sterile, however good the cycle printout looks. Where the water comes from, why some loads trap it, how a drying phase gets it out, and the loading and cycle choices that keep packs dry.
Why a wet pack is a failed pack
WHO describes wet packs as moisture — dampness, droplets or puddles — on or within a package, and treats their sterility as compromised. CDC’s guideline says sterile items that become wet are considered contaminated. The reason is wicking: wet paper and wraps let microorganisms travel through the barrier, and moisture also corrodes instruments.
- External wetness: a damp outer wrap or damp pouch paper.
- Internal wetness: droplets or a puddle inside the pack, tray or cassette.
- More than one wet pack in a cycle is a wet load — look for a cause in the load or the machine, not just in the pack.
Where the water comes from
Steam heats the load by condensing on it. Every cold instrument turns some steam into water until it reaches chamber temperature, so a heavier load makes more condensate. Most of that water should run off and drain away during the cycle, and the drying phase should evaporate the rest — under vacuum in a Class B machine, so the water boils off at a lower temperature.
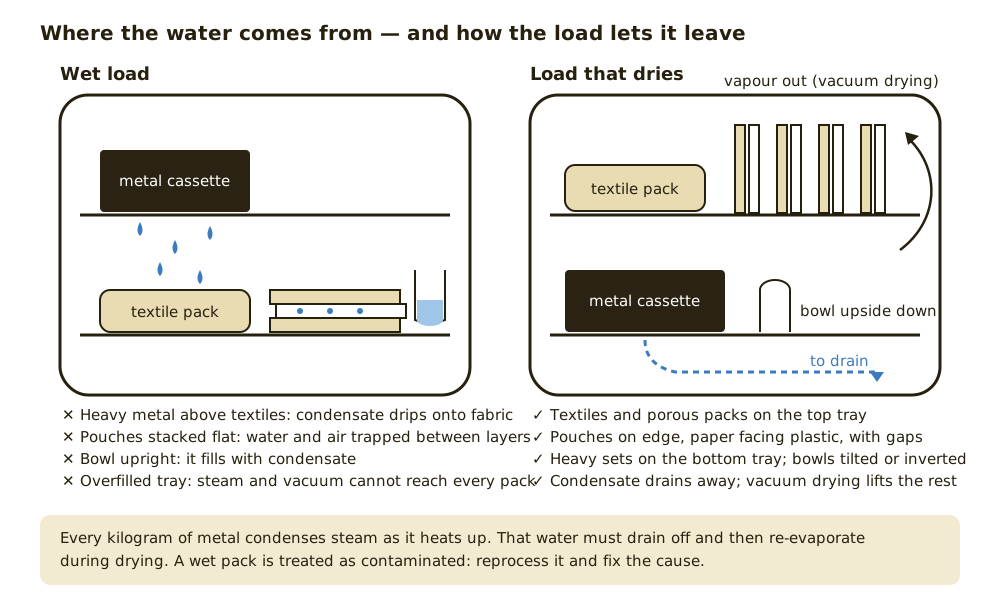
Metal mass
CDC names heavy metal mass as a cause of wet packs: dense instrument sets condense a lot of steam and hold the water in trays and cases.
Water that cannot drain
Flat-stacked pouches, upright bowls and closed cassettes hold condensate where the drying phase cannot reach it.
Cooling too fast
A hot pack placed on a cold metal bench or under an air-conditioning vent condenses moisture inside it. CDC’s dental guidance says packs should dry inside the chamber and not be touched until cool and dry.
Steam that is too wet
Water droplets carried in the steam soak the load directly. CDC describes ideal sterilising steam as at least 97% dry; scale in the steam generator and poor feed water make wet steam more likely.
Causes and fixes
| Cause | What you see | Fix |
|---|---|---|
| Overloading, or packs too dense | Several wet packs, wettest in the middle of the load | Run smaller loads within the maker’s tray and cycle limits; split heavy sets |
| Pouches stacked flat or overlapping | Water trapped between pouches; damp paper | Stand pouches on edge in a rack, paper facing plastic, with gaps (CDC) |
| Heavy metal above textiles or paper | Drips and water marks on lower packs | Heaviest sets on the lowest tray, porous packs on top |
| Bowls, cups and containers upright | Puddles inside | Place them on their edge or upside down so water drains |
| Wrong packaging, or double-pouching with the wrong pouches | Wet inner pouch; sodden wrap | Use packaging made for steam; double-pouch only with pouches designed for it (Tuttnauer) |
| Instruments packed wet after cleaning | Wet trays even in light loads | Dry instruments fully before packing |
| Drying phase cut short or skipped | Packs damp at the door | Let the full drying phase finish; choose a cycle with drying for anything to be stored |
| Poor feed water or scale in the generator | Spots and residue as well as wetness | Use the water quality the maker specifies, usually distilled or deionised; descale and service |
| Packs cooled on a cold surface | Dry at the door, damp minutes later | Cool packs on a rack or the tray, away from air-conditioning vents |
What is optimal: a load that dries
- Treat the steriliser maker’s maximum load per tray and per cycle as a ceiling, not a target.
- Follow CDC’s loading principles: peel packs on edge in perforated or mesh-bottom racks, perforated trays parallel to the shelf, non-perforated containers such as basins on their edge, and small items loosely in wire baskets.
- Heaviest items lowest, porous items highest.
- Choose a wrapped or porous cycle with full vacuum drying for anything that will be stored.
- Leave packs in the chamber until drying ends, then let them cool on a rack before touching or stacking them.
- Check every pack: dry, seal intact, indicator changed.
Read next How to load an autoclavePouches, tape and indicators
When wet packs keep happening
- Note which tray, pack type and cycle the wet packs came from. A pattern points to the cause.
- Run a light test load. If it dries, the load is the problem; if it does not, the machine may be.
- Have the steriliser checked: vacuum pump, door seal, drain and steam generator. SHTM 01-01 includes load dryness tests among the tests used when sterilisers are validated.
- Do not change cycle settings or add absorbent paper without the steriliser maker’s advice.
Read next Autoclave troubleshootingAutoclave water qualityServis autoclave (BM)
Related guides
Autoclave supply near you
Written quotes for clinics across Malaysia, handled from Batu Caves, Kota Kinabalu and Kuching.
Sources and further reading
- WHO — Decontamination and Reprocessing of Medical Devices for Health-care Facilities (2016)
- CDC — Guideline for Disinfection and Sterilization in Healthcare Facilities (2008, updated June 2024)
- CDC — Guidelines for Infection Control in Dental Health-Care Settings, 2003 (MMWR 52, RR-17)
- Tuttnauer — Wet packs in tabletop autoclaves: a common and preventable problem
- NHS National Services Scotland — SHTM 01-01 Part C: Sterilization by steam (2018)
Frequently asked questions
Is a wet autoclave pouch still sterile?
Why are my autoclave pouches wet after the cycle?
How long should an autoclave drying phase be?
Can I dry wet pouches afterwards and still use them?
Do heavy instrument cassettes cause wet packs?
Get a written quotation
Tell us your clinic or lab type, daily workload and location. We match suitable models and send a written quotation that states who handles delivery, installation and training, and what each costs.
010-905 2891 · Mon–Sat, 9:00 am – 6:00 pm